How to Use Bybit
This post summarizes how to use Bybit at once. It provides step-by-step instructions for registration, KYC identity verification, deposit, Tether exchange, futures wallet transfer, and futures order. Although it may seem daunting as an overseas exchange, it is easy once you grasp the flow. The necessary screen locations and button names are written as they are, so you can follow along in order.

1. Registering for Bybit
You can easily register for Bybit with your email or mobile phone. It is recommended to take advantage of referral programs to receive fee discounts.
If you register with a referral code, you can participate in a maximum 20% fee discount and up to $30,000 deposit bonus event. Futures use leverage, so even small fee differences accumulate significantly. Clicking the link will take you to the registration page with the referral code automatically entered. Select either email or mobile phone to proceed with registration. You must use an address that can receive verification codes, and if the code does not arrive, press resend. The password must include special characters, uppercase letters, lowercase letters, and numbers. If you do not meet the conditions, the setting will be rejected.
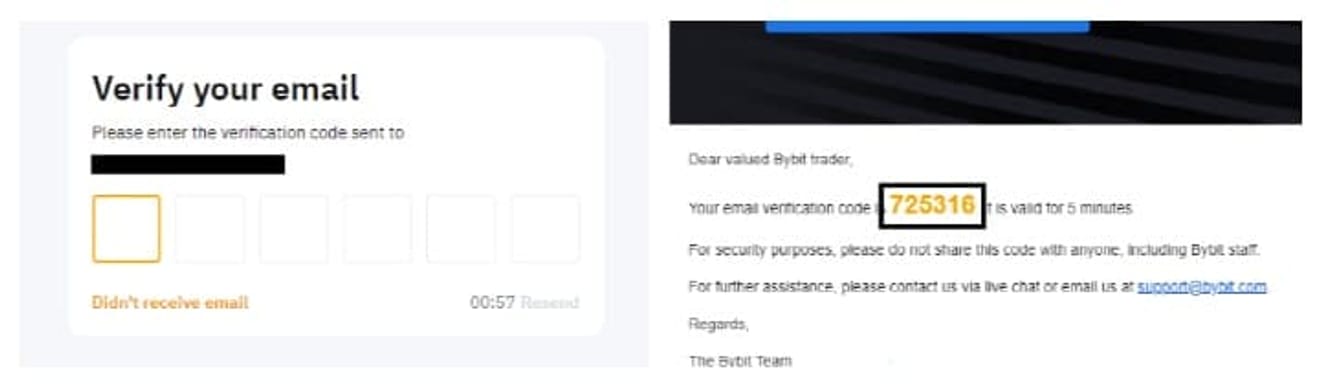
After entering your account and password, a 6-digit verification code will be sent to your email or mobile phone. Enter the code to complete the registration. If the verification code does not arrive, press 'Didn’t receive email' at the bottom of the screen to resend. After verification, it is recommended to register for 2-factor authentication (OTP) for account security.
2. Bybit KYC Identity Verification
KYC is required to use deposits and futures trading. You can use most features even if you only complete step 1.

After registration, click the profile icon in the upper right corner to go to the dashboard. If you don't see the icon, log in first.

Click ‘Get Verified Now’ to start verification. Select the type of ID and take and submit photos according to the instructions. Results usually come out within 10-20 minutes. Keep the lighting bright and minimize reflections and shadows. You can exit the app during the review, and you will receive a notification upon completion. Once the KYC completion mark appears, deposits, withdrawals, and futures trading become available.
3. Depositing on Bybit
Upbit is a travel rule registered exchange, so you can freely transfer with Bybit. Since you cannot send domestic Korean won directly, you can withdraw coins from a domestic exchange and deposit them to Bybit.

After logging in, click ‘Deposit(입금)’ in the upper right corner.
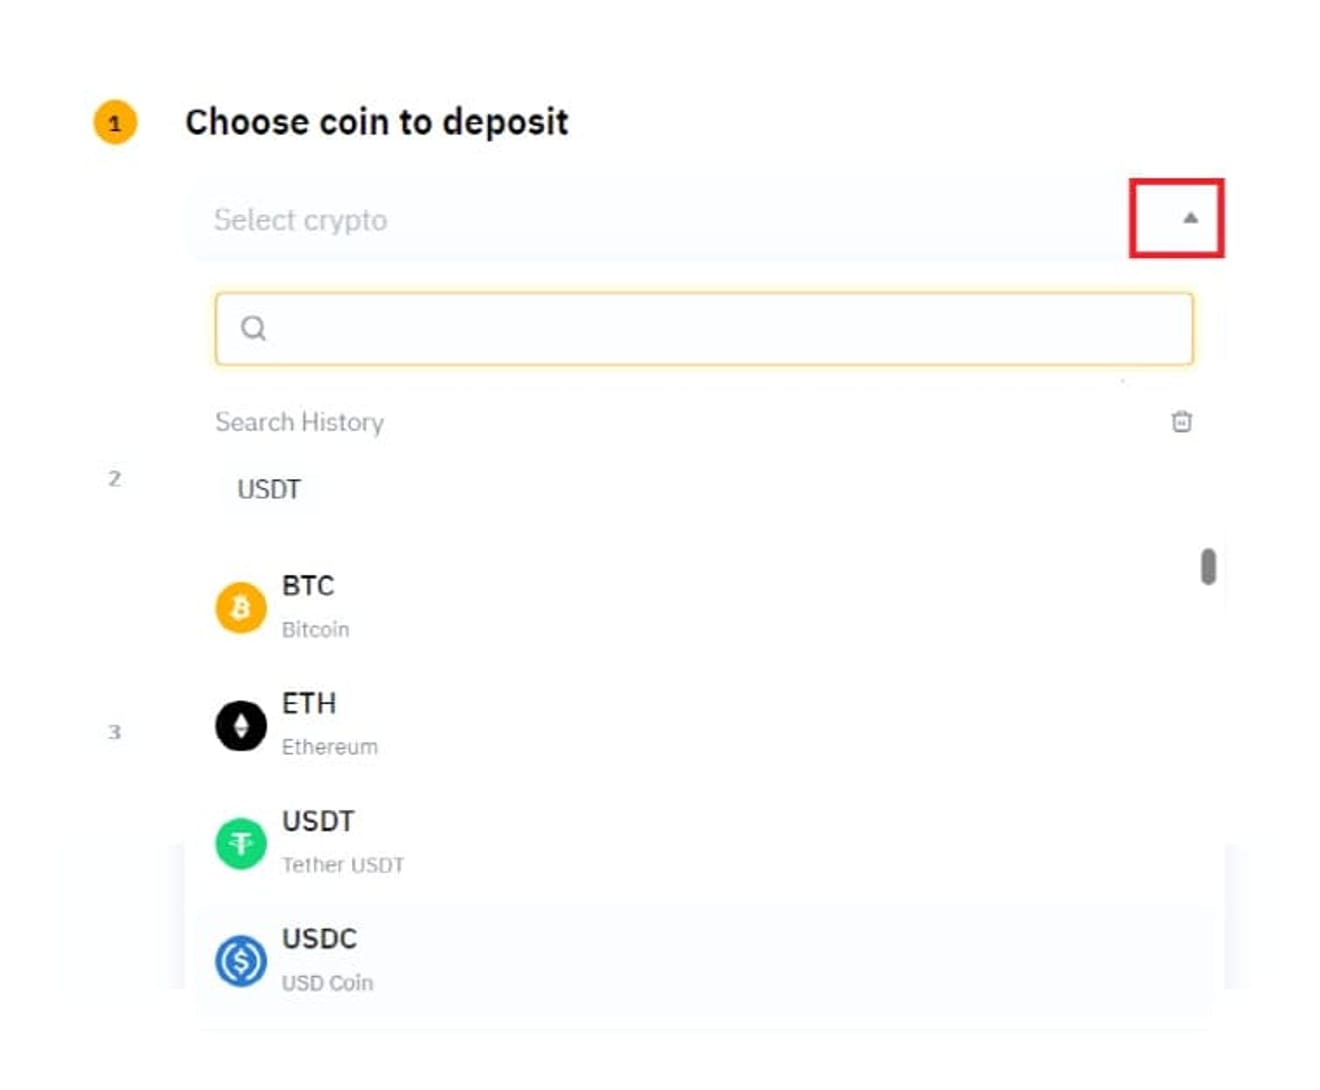
Select the coin you want to deposit. Enter the English name or ticker in the search bar. Coins with advantageous fees and speeds, such as Ripple (XRP), Stellar (XLM), and EOS (EOS), are often used.
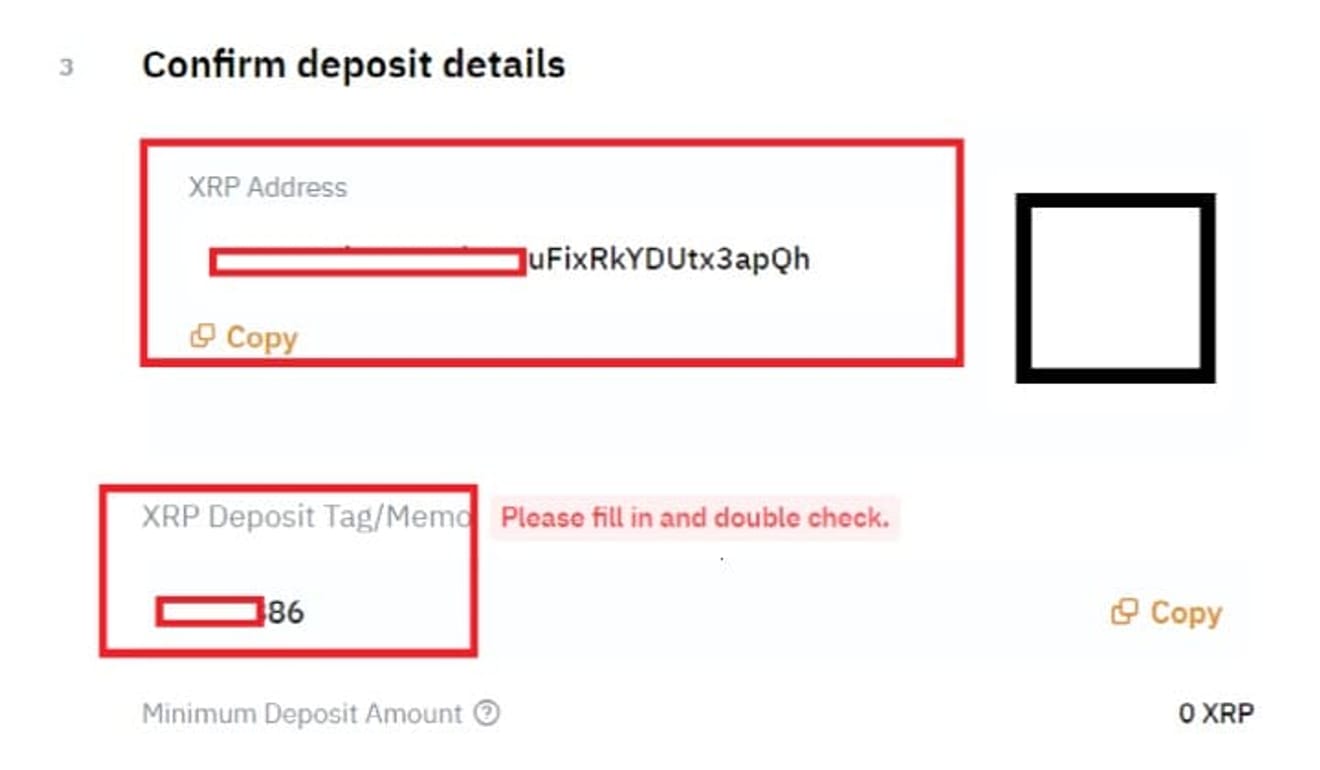
If you select a coin and a network (chain), a deposit address and tag will be generated. Copy both values accurately. If the network is different, your assets may disappear, so make sure they match.

Upbit → Go to ‘Deposit/Withdrawal’ at the top.

Find the coin in the search bar and click ‘Deposit/Withdrawal’.

Select ‘Withdrawal Request’. Based on Ripple, a normal withdrawal takes about 3-5 minutes. After entering the quantity and clicking confirm, the receiving address and tag input window opens. Paste the address and tag copied from Bybit respectively, and complete your identity verification such as KakaoTalk, Naver, or public certificate. After the application, you can check the deposit history in Bybit ‘Assets’ after the blockchain propagation is complete. Tag omission is a major cause of deposit delays. Make sure to enter both the address and the tag.
4. Buying Tether on Bybit
To use USDT (Tether)-based futures, you need to exchange your deposited coins for Tether. Tether's value is stable at 1USDT ≈ $1.
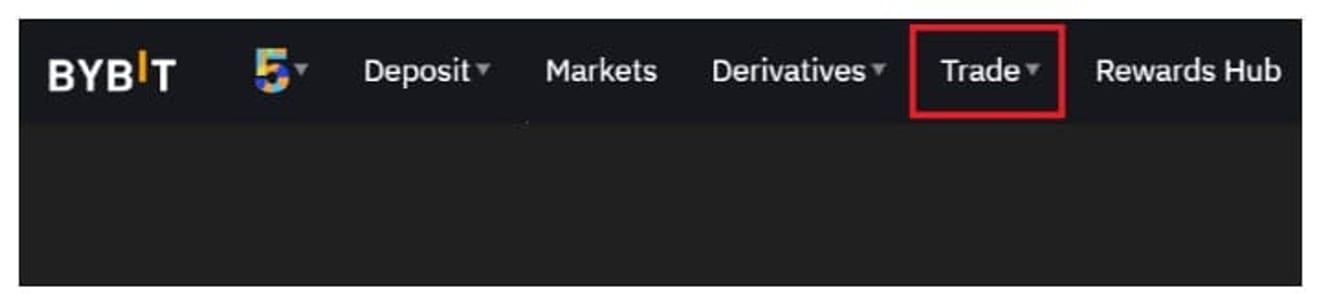
Click ‘Trade’ at the top to move to the Spot screen.

Hover your mouse over the ‘=’ button in the upper left corner and enter the ticker of the deposited coin. Select the USDT pair for that coin in the search results. Example: XRP/USDT, TRX/USDT.

In SPOT, select Sell(매도)·Market(시장가) and set the quantity with the bottom bar (25%, 50%, 75%, 100%), then sell. Once executed, USDT will enter your wallet. It is better to sell with a little more than the required quantity, considering fees and slippage.
5. Moving Assets on Bybit
Futures trading uses the balance of the futures wallet (Derivatives). You must move assets from Spot or Funding to the futures wallet to place an order.
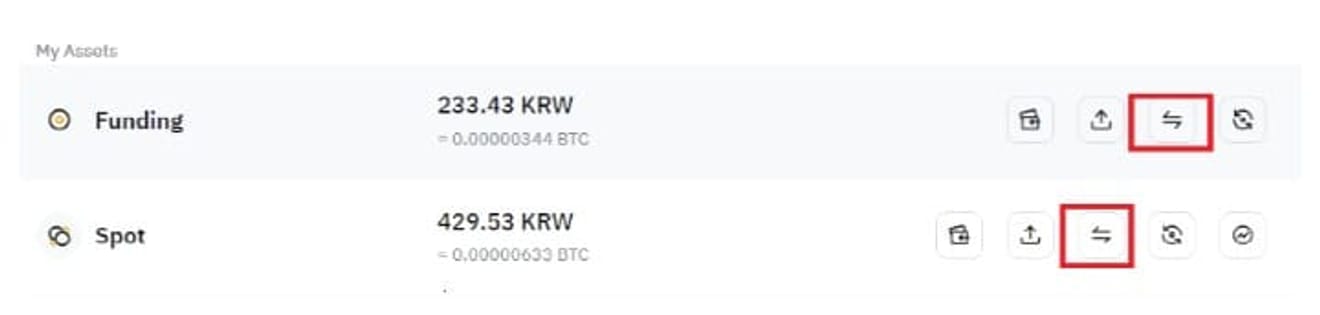
Click Main → Asset(자산) → Transfer(변환). Select the sending and receiving wallets on the screen.
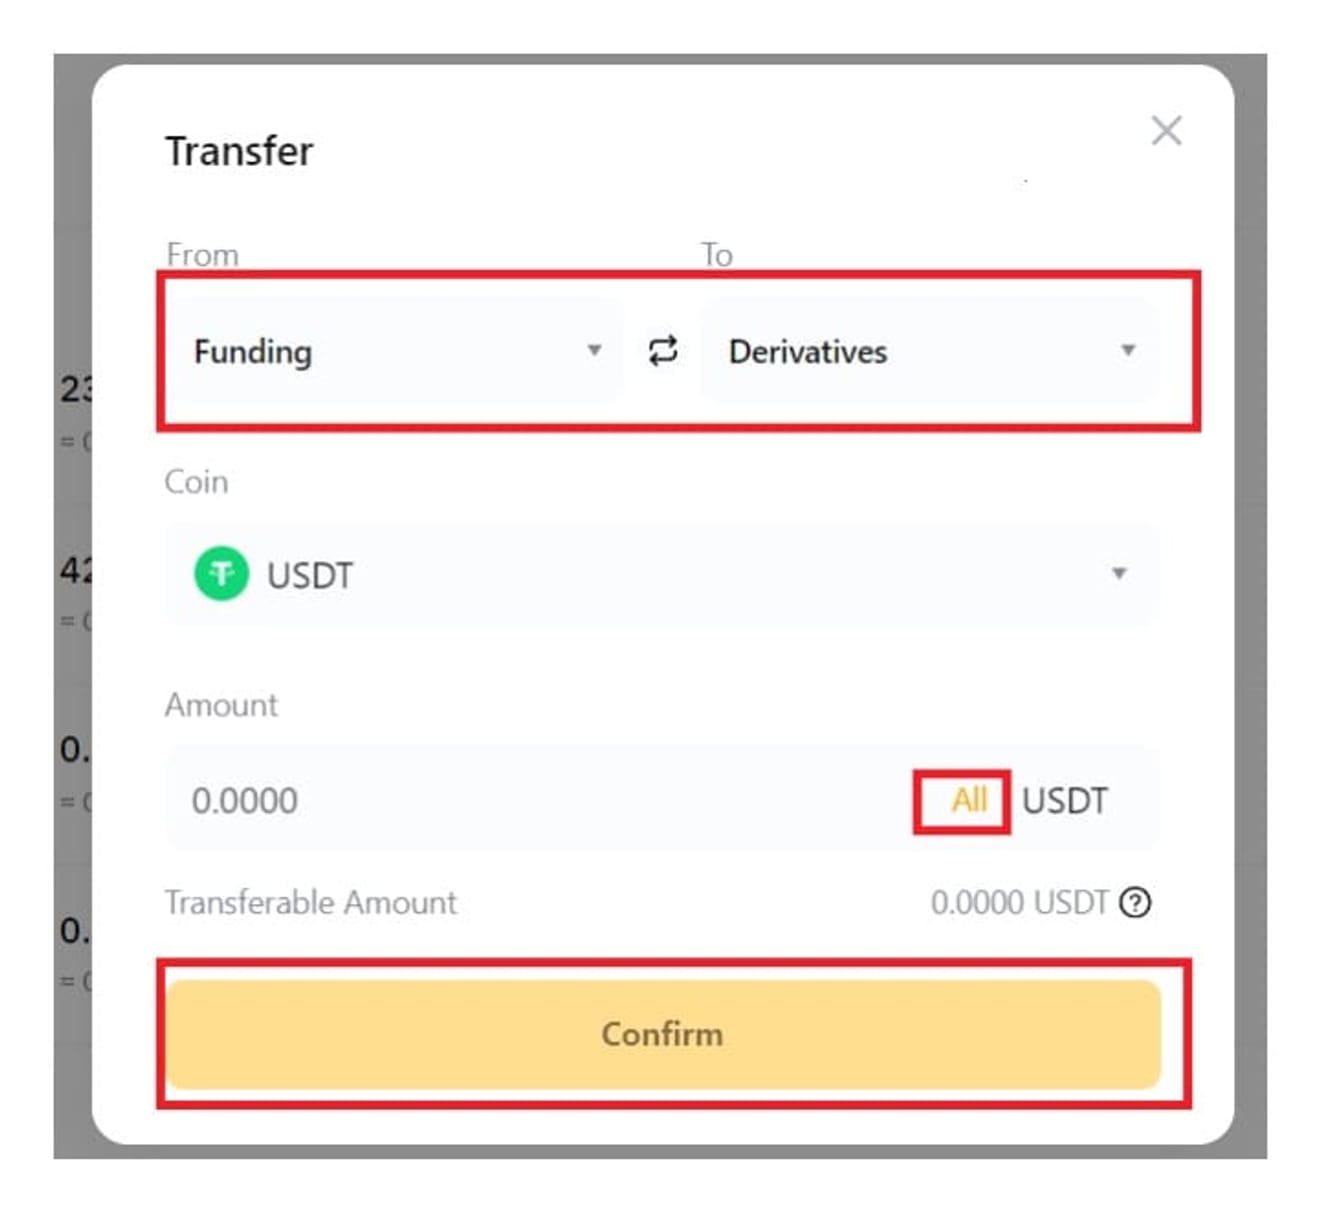
Select Funding or Spot for From, and Derivatives for To. Specify USDT for the coin, enter the quantity, and click ‘Confirm’. The transfer is reflected immediately. It is then displayed as available margin on the futures screen. If necessary, reverse transfers (futures → spot) are also possible with the same procedure.
6. Trading Futures on Bybit
If you have completed registration, KYC, deposit, Tether exchange, and asset transfer, it's time to place a futures order.
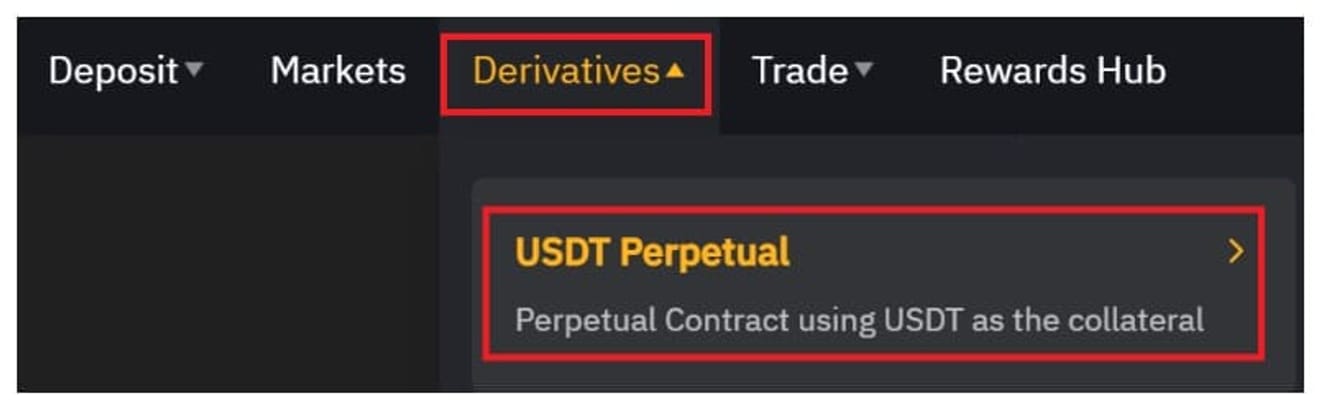
Select ‘Derivatives(파생상품/선물 거래)’ → ‘USDT Perpetual(무기한 선물)’ at the top.

Hover your cursor over ‘=’ in the upper left corner and enter the English name of the coin you want to trade to select the item. It also supports popular, new, and thematic recommendation lists and sorting by name, price, 24-hour rate of change, and trading volume. It is convenient to add items of interest to your favorites.

Two essential settings before trading are the trading mode (cross/isolated) and leverage. You must specify them separately for each item, and the values set in BTC will not be automatically applied to ETH or FIL.

① Trading mode:
- Cross (교차마진): Uses all assets in the futures wallet as common collateral. Although profits can support other positions, the entire balance can be at risk during liquidation.
- Isolated (격리마진): Separates collateral for each position. Liquidation risk is limited to that position. Suitable for beginners and risk management purposes.

② Leverage: Enter the number directly or adjust by dragging the bar. The higher the leverage, the greater the sensitivity of price fluctuations relative to the margin. Generally, 3-7 times for BTCUSDT and 3-5 times for top altcoins are recommended. Start lower for volatile items.
Once you have decided on the mode and set the leverage, only the order remains.
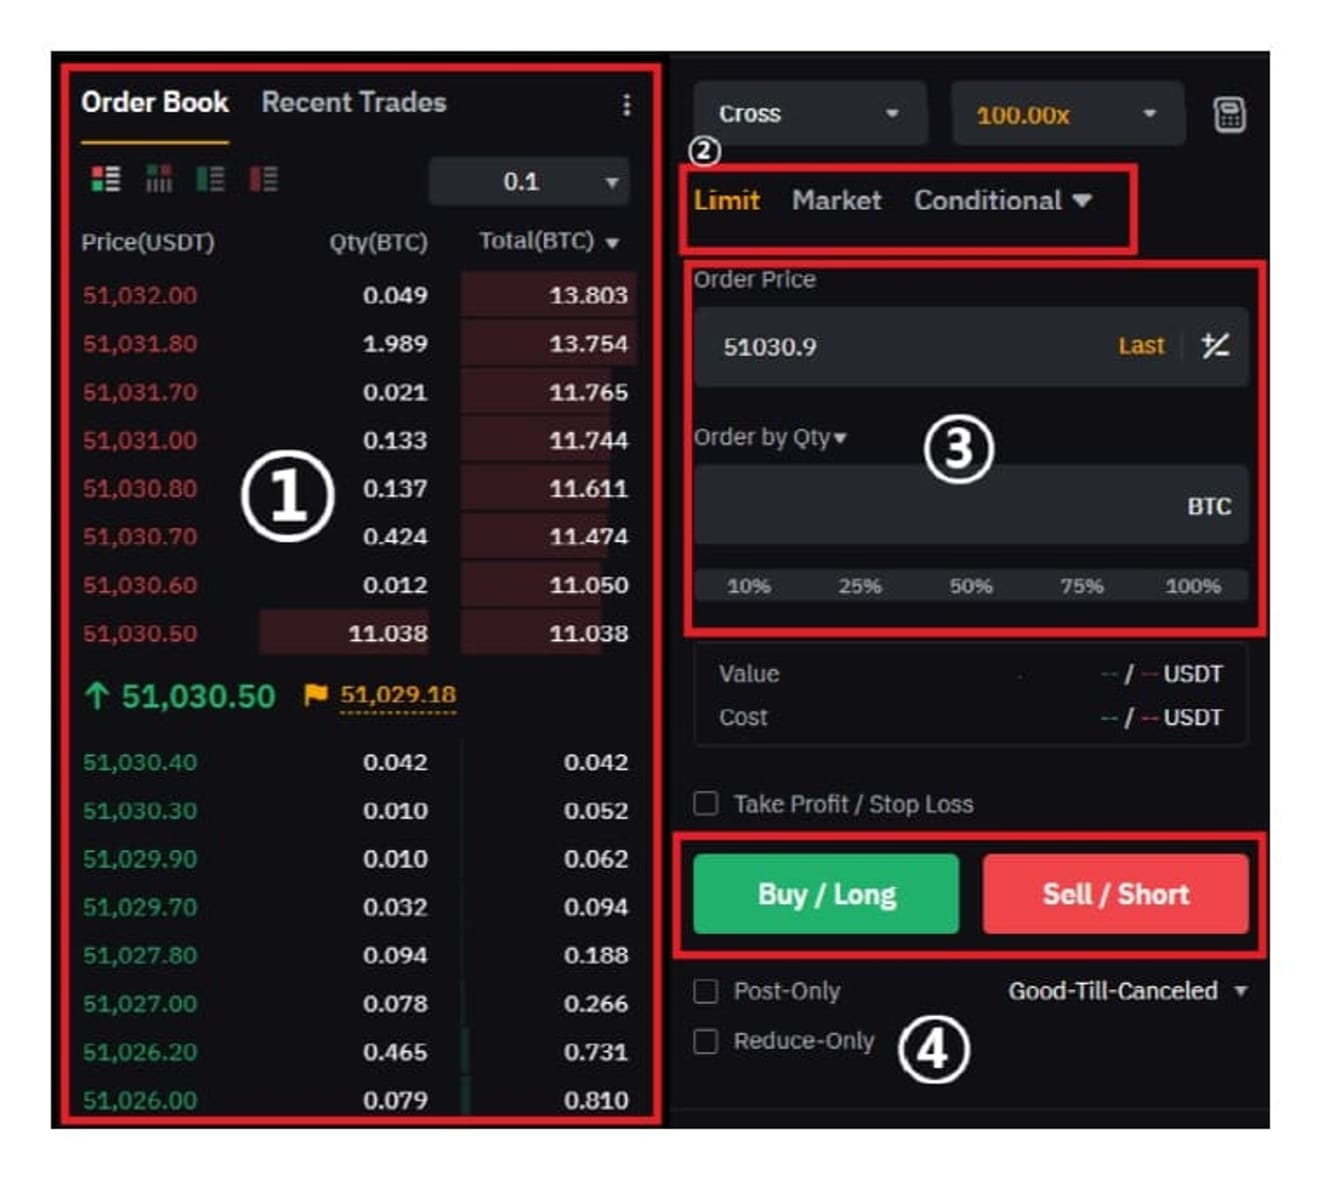
Choose the type from the order panel on the right.
- Limit (지정가): Reservation execution at the desired price. Click the price in the order book to automatically enter it.
- Market (시장가): Immediate execution. Slippage is possible during rapid changes.
Enter the price (when choosing a limit price) and quantity (percentage based on USDT balance), and then press the button to place an order. The green button (long/buy) is used when the outlook is rising, and the red button (short/sell short) is used when the outlook is falling. After execution, you can check the entry price, unrealized profit and loss, liquidation price, margin, etc., in the position area below. If necessary, set TP/SL (take profit/stop loss) in advance. This greatly reduces risk in a rapidly changing market.
Here's a final tip. If the loss in one item becomes large, lower the leverage and switch to isolation to limit the range of the loss. You can reduce unnecessary costs by checking the funding fee time and rate as well. Short-term scalping has a high convenience of market price execution, but the burden of fees and slippage increases. Use it only when there is sufficient order liquidity, and it is usually more stable to operate mainly with limit orders. When closing a position, you can also close with a limit price or market price in the same panel. The habit of consistently realizing even small profits protects your account.