How to Connect Redotpay to Google Pay | App Download | Sign Up | KYC Verification | Card Issuance | Payment
In today's blog, we will explore how to connect Redotpay to Google Pay, app download, sign-up, KYC verification, card issuance, and payment. If you want to conveniently pay with cryptocurrency using your smartphone, connecting Redotpay and Google Pay is the best choice. You can use digital assets, including USDT, at general stores worldwide with just your smartphone, without a physical card. However, to connect to Google Pay, you must sequentially complete all steps, from downloading the Redotpay app to signing up, KYC verification, and card issuance. In particular, Google Pay has strict security, and if problems occur during the card registration process, you may have to start over. In this article, we will guide you step-by-step through the entire process, from downloading the Redotpay app to connecting to Google Pay and making actual payments. We will also provide solutions to the problems that may occur at each stage, helping you to successfully establish a cryptocurrency mobile payment environment in one go.

1. Download and Sign Up for the Redotpay App
Please access through the link below. You can sign up with your email or mobile phone number.
If you sign up through the above link, you will receive $5, and a 20% discount will be offered upon card issuance. Activate your account by entering the verification code sent via email or SMS. (Physical Card Promotion Code: Redot2025, Virtual Card Promotion Code: 200FF2025)

2. Complete Real Name Registration and KYC Verification
After creating an account, you must complete real-name registration and KYC (Know Your Customer) identity verification. Go to 'Profile' or 'Settings' on the home screen and select 'KYC Verification' or 'Identity Verification'. Take photos of the front and back of your ID card (passport or driver's license) and upload them. Proceed with selfie verification, and follow the on-screen instructions to face the camera directly and take a clear photo.
You must upload a proof of address. You can use utility bills, bank statements, etc., and English documents are recommended. KYC verification usually takes 1-3 days, and you can check the approval via email or in-app notifications.

3. Get a Redotpay Card
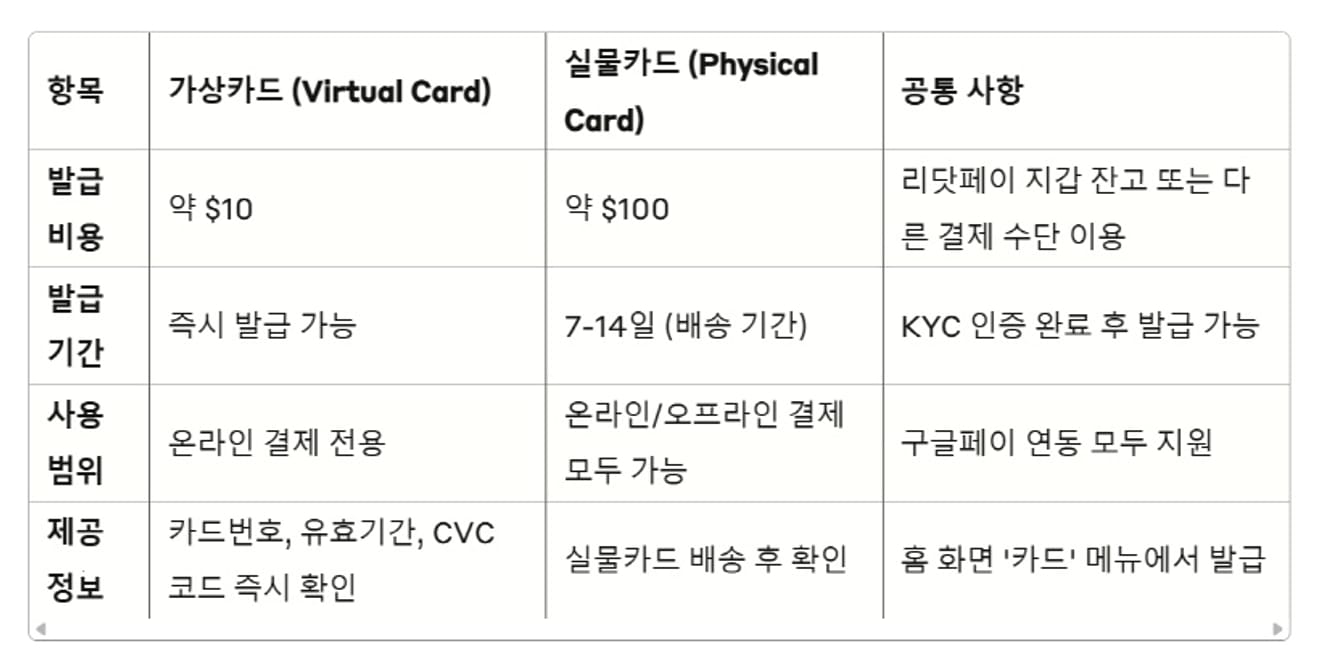
Once KYC verification is complete, you can get a card. Go to the 'Card' menu on the home screen. You can choose between two card types.
Virtual Card
1. Issuance Fee: About $10
2. Instant Issuance
3. For online payments only
Physical Card
1. Issuance Fee: About $100
2. Delivery Period: 7-14 days
3. Both online/offline payments are available
You can use both cards to connect to Google Pay, so it is recommended to start with a virtual card considering the cost. After selecting the desired card type, pay the issuance fee. It will be deducted from your Redotpay wallet balance or you can use other payment methods. Virtual cards are issued immediately, and you can check the card number, expiration date, and CVC code.
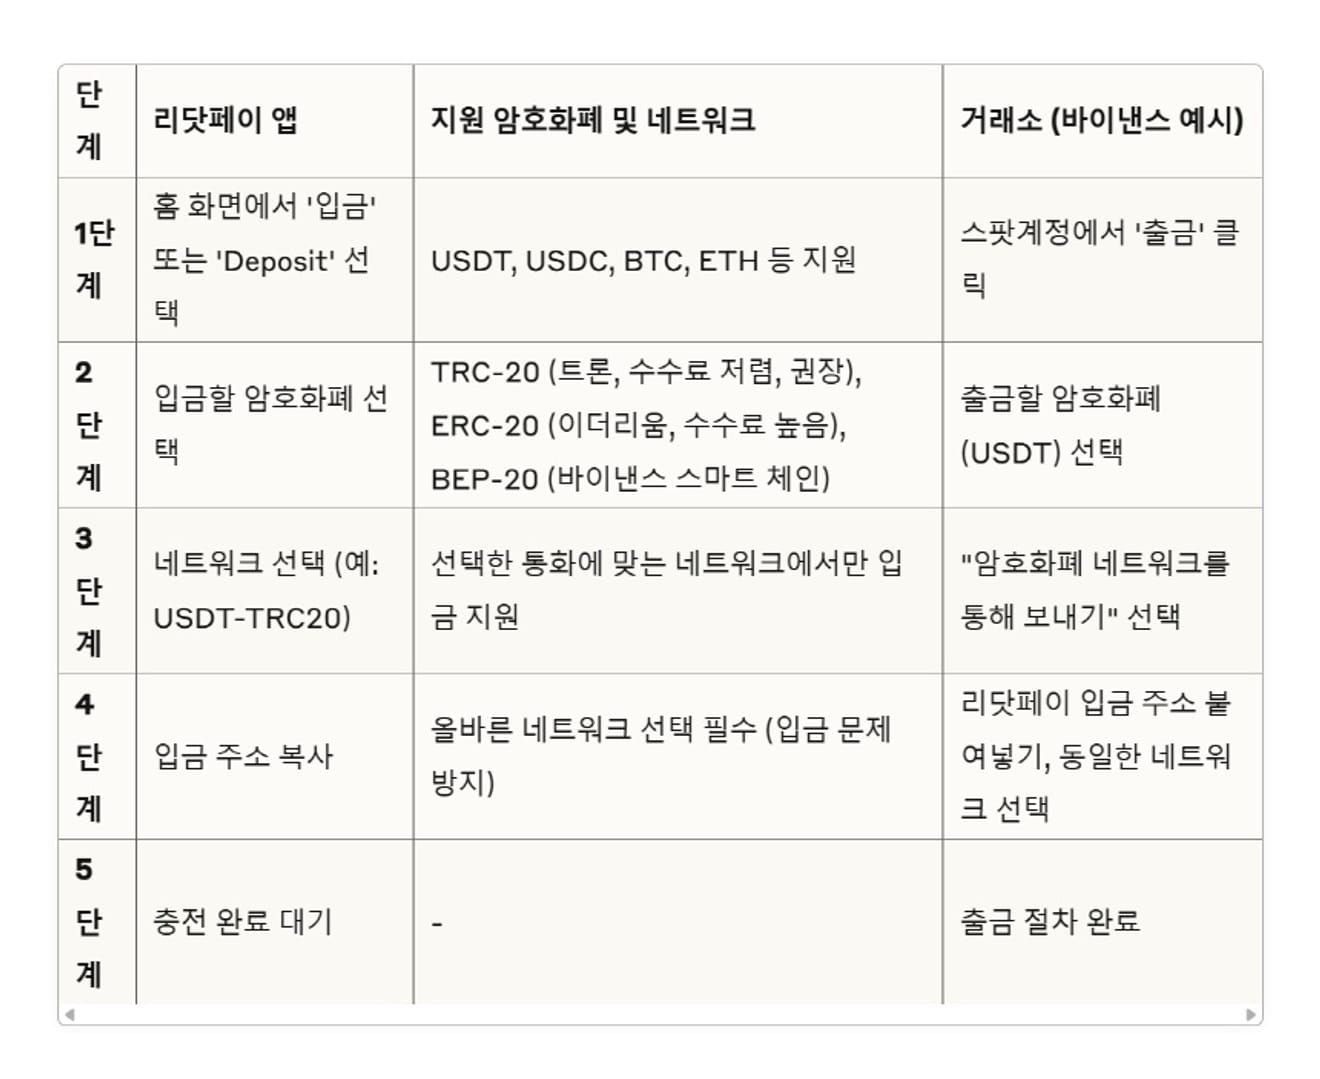
4. Charge Redotpay with Cryptocurrency
You must charge your Redotpay wallet with cryptocurrency before using the card. Select 'Deposit' on the home screen. Select the cryptocurrency you want to deposit. It supports USDT, USDC, BTC, ETH, etc., and select the appropriate network for the selected cryptocurrency. USDT supports several networks.
- TRC-20: Tron Network (Low Fees, Recommended)
- ERC-20: Ethereum Network (High Fees)
- BEP-20: Binance Smart Chain
In this example, we will use USDT-TRC20, which has low fees. Only the network that matches the selected currency supports the deposit of that currency, so copy the address and open the exchange app that holds the cryptocurrency. For example, go to your spot account in the Binance app and click 'Withdraw'.
Select the cryptocurrency (USDT) to withdraw and choose "Send via crypto network." Paste the deposit address you copied from Redotpay into the withdrawal address field and be sure to select the same network (TRC-20). You must select the correct network to prevent deposit problems. Tap 'Withdraw' and complete the withdrawal process according to the app's instructions.
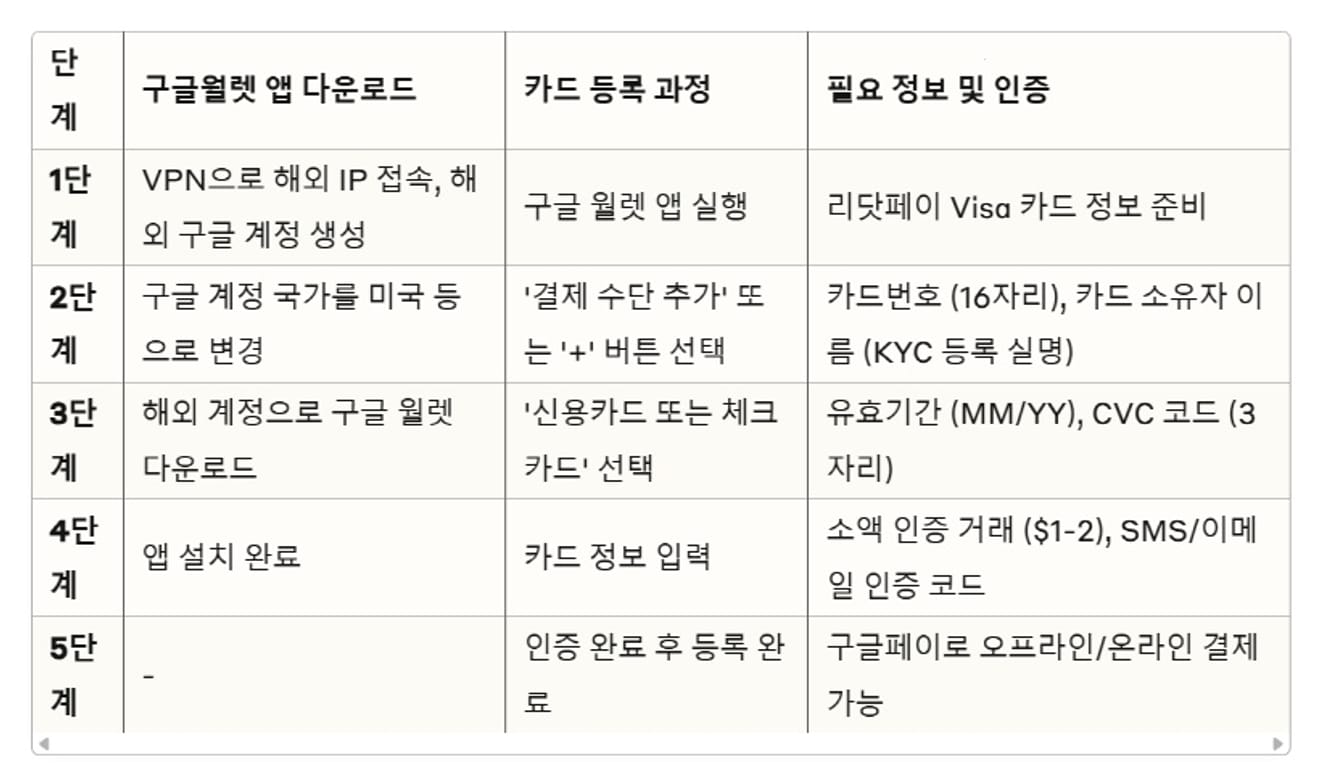
5. Register the Redotpay Card in Google Pay
Downloading Google Wallet (Google Pay) may be restricted from the Korean Google Play Store. In this case, try the following methods:
- Create an overseas Google account: Use a VPN to connect to an overseas IP, such as the US, and then create a new Google account.
- Set Account Country: Change the country in Google account settings to the United States, etc.
- Download Google Wallet: Download the Google Wallet app with an overseas account.
Run the Google Wallet app and select 'Add a payment method' or the '+' button. Select 'Credit or debit card' and accurately enter the Visa card information you received from Redotpay.
1. Card number: 16-digit Visa card number
2. Cardholder name: Real name registered during KYC verification
3. Expiration date: MM/YY format
4. CVC code: 3-digit security code
After entering the card information, the authentication process will proceed. A small authentication transaction ($1-2) may occur, and an authentication code may be sent via SMS or email. Once the authentication is complete, you can use the Redotpay card in Google Pay. After registration, you can make offline and online payments through Google Pay.
6. Pay with Google Pay
Select the 'Google Pay' option when paying at online shopping malls or apps. The registered Redotpay card will be automatically charged. At stores that support NFC, you can pay by placing your smartphone over the card reader.
The payment is complete. The process of applying the exchange rate and deducting from the balance is carried out immediately when the payment is approved.